Why You Should Use ngOnDestroy in Angular

In Angular, lifecycle hooks are methods that execute at specific points during a component’s lifecycle—from initialization to updates and eventual destruction. To control component behavior at these key points, we implement specific lifecycle hook methods.
For example, the ngOnInit hook runs upon component initialization. It’s commonly used for setup tasks, like fetching data or configuring settings:
When the component above is initialized, it will log the text “initialized” to the console.
The ngOnDestroy Hook
The ngOnDestroy hook runs just before Angular destroys the component. It’s intended for cleanup tasks, such as unsubscribing from observables or stopping timers:
The component above logs “destroyed” to the console right before it is removed from the view.
Although the purpose of ngOnDestroy is straightforward, many developers overlook it or forget to use it altogether. Even when ngOnDestroy is implemented, developers sometimes fail to unsubscribe from all observables or stop timers. This often happens due to tight deadlines or because skipping ngOnDestroy doesn’t usually cause immediate or obvious issues. Components typically continue to render, navigate, and update as expected, so the effects of not using ngOnDestroy might not be noticeable right away.
However, without ngOnDestroy, issues like memory leaks, increased network calls, and unexpected behavior can gradually accumulate, especially in applications with heavy navigation or dynamically created components. These problems often surface later as performance degradation, inconsistent data, or erratic app behavior, making it difficult to trace the cause back to a missing ngOnDestroy.
In the rest of this article, we’ll simulate scenarios where ngOnDestroy should be used for cleanup but isn’t, observe the resulting behavior, and then compare it to cases where ngOnDestroy is implemented correctly to show why it’s essential.
Setting Up the Angular Project
Let’s start by bootstrapping a new Angular project. If you haven’t already, install the Angular CLI (Command Line Interface) globally on your machine:
npm install -g @angular/cli
Use the ng new command to create a new Angular project. Replace my-app with your preferred project name:
ng new my-app
This will prompt you with several questions to configure your project, such as whether to include routing and which stylesheet format to use (CSS, SCSS, etc.). Choose the options that best fit your needs.
Once the project is created, navigate into the project folder:
cd my-app
Run the application locally with the ng serve command:
ng serve
This will start a development server, and you can open your browser and visit http://localhost:4200 to view your new Angular project in action.
Memory Leak: Accumulating Subscriptions
A memory leak occurs when a component subscribes to an observable but doesn’t unsubscribe. When the component is destroyed (e.g., through routing), the subscription persists and holds onto the component’s memory. Let’s create a component that subscribes to an observable (interval) but doesn’t unsubscribe:
Create a MemoryLeakComponent at src/app/memory-leak.component.ts with the following code:
This component subscribes to an interval that triggers every 1000 milliseconds (1 second), increments the count every second, and logs the count to the console, as well as displays it in the component’s UI.
Next, update the app’s routes at src/app/app.routes.ts to include a route for the MemoryLeakComponent:
Then, update src/app/app.component.html to include a button that navigates to the "memory-leak" route:
In src/app/app.component.ts, define the navigate method:
When we load the app and navigate to the MemoryLeakComponent, the count is displayed and updated. When we click “Go back”, the component is destroyed. Upon returning to the "memory-leak" route, the counter resets to 0, and everything seems to work as expected. At this point, we might assume that not using ngOnDestroy doesn’t cause any issues.
However, let’s observe the behavior more closely. From the "/" route, open the browser’s console and refresh. Navigate to the "memory-leak" route, and the count will log correctly. Now, go back to the "/" route. Even though the MemoryLeakComponent is no longer visible, the count is still being logged in the console. This means the interval subscription continues to run even after the component has been destroyed.
When we return to the "memory-leak" route, a new subscription starts, even though the previous one is still running. We now have multiple counters running simultaneously:
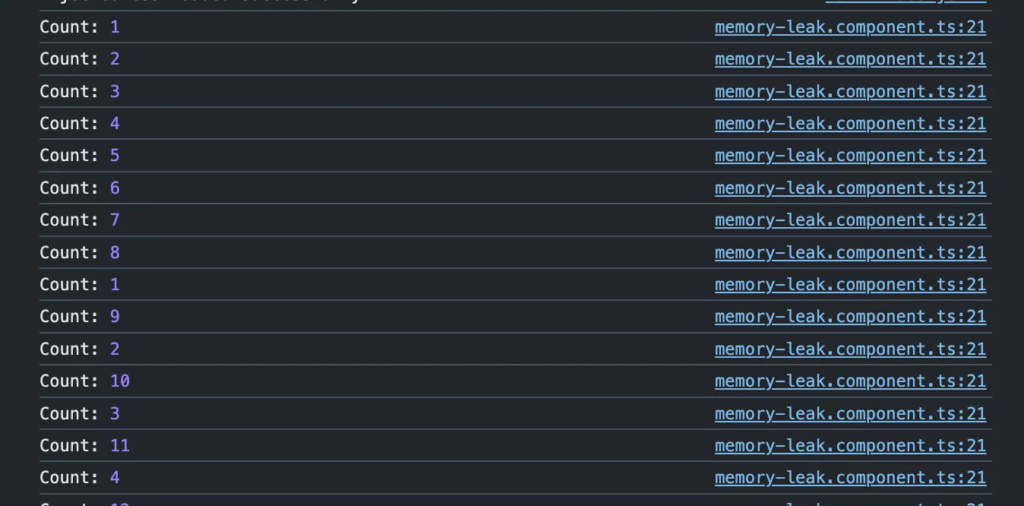
If we repeat this multiple times, new subscriptions are created each time, leading to multiple simultaneous subscriptions. If the logic inside the interval is heavy, this can have a significant impact on the app’s memory.
As developers, it’s easy to overlook this issue when the main functionality behaves correctly. However, the accumulating subscriptions can cause significant performance problems.
Now, let’s fix the memory leak by unsubscribing from the observable when the component is destroyed:
With this fix, when we navigate to the "memory-leak" route and go back to "/", the console logs “Unsubscribed and cleaned up”, and no count continues running. If we navigate back to the "memory-leak" route, the count starts afresh, both in the UI and console, with no lingering subscriptions.
Other Scenarios Where ngOnDestroy is Necessary
While we focused on subscription cleanup in the previous example, the ngOnDestroy lifecycle hook is crucial for handling many other scenarios that involve resource cleanup or teardown. Without properly using ngOnDestroy, several issues can arise that negatively affect application performance and behavior.
Here are some other scenarios and the problems that can occur when ngOnDestroy is not implemented:
- Repeated Event Listeners: Event listeners attached to DOM elements or other events (e.g.,
window,document) can continue running even after a component is destroyed. If these listeners are not removed, they can lead to memory leaks, performance issues, and unexpected behavior, as they may continue to execute logic or access outdated component data. The app may continue to respond to events like scroll or resize, causing unnecessary computations and UI updates even when the component is no longer visible. - Conflicting Data Changes After Component Destruction: If a component still listens for or attempts to modify data after it has been destroyed, it can lead to conflicts or inconsistent states. For example, an HTTP request might still be processing, and the response could attempt to update data on a component that no longer exists, leading to errors. And even when there are no errors, it could result in data overwrites, or undefined states that may not be easily detected, causing data integrity issues.
- Unnecessary API Requests: Components that initiate API calls (e.g., through services or observables) might still send requests after they’ve been destroyed if not properly unsubscribed. These unnecessary requests can increase server load, waste bandwidth, and degrade performance.
- Unstopped Animations After Component Destruction: If animations are not properly destroyed when a component is removed, they may continue running in the background. This can create visual glitches, such as lingering transitions or effects that don’t align with the current state of the application.
Conclusion
In this article, we highlighted the importance of using the ngOnDestroy lifecycle hook to manage resources in Angular components. Proper cleanup of subscriptions, event listeners, timers, and other resources prevents memory leaks and performance issues. By implementing ngOnDestroy, developers can avoid problems like unnecessary API calls and unexpected behavior, ensuring a more stable and efficient application. Proper resource management is key to building reliable Angular applications.